Improved SBC Timing Chain Oiling

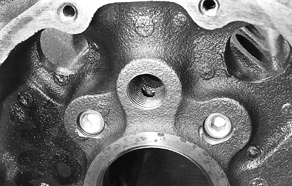
In the plug in the passenger side passage, drill out the plug 0.030" (1/32") to spray on the chain. You can also drill the other two plugs to release trapped air, but it's not necessary.

You can tap the plug holes with  a 1/4' pipe tap and use pipe plug, but use a shallow plug for the center hole so as to not to block the oil galley behind it.


Oil pump pickup should be held 3/8' to /1/2" off the bottom of the pan. When located correctly, weld the pickup in place.

REFERENCE

Block Plug Basics, Super Chevy

"Most small-blocks feature four 3/8-inch threaded holes (two per side) at the front of the block. The upper hole adjacent to the fuel pump passes into the crankcase area and if left open will allow oil to leak out from the block. Be certain to plug this hole only with a short 3/8-inch bolt (1/2-inch long). Because this hole aligns perfectly with the fuel pump’s pushrod, a longer bolt will contact and seize the pushrod during engine operation."

Grump's Performance Oil System Mods.
Comments

Popular posts from this blog

WTF is a Franzinator?

Sometimes the most useful things have the oddest names. Take the Franzinator, for instance. Named after Franz©, its curmudgeonly inventor, the Franzinator is a device used to separate moisture from compressed air. Having moisture in compressed air is not a a good thing, especially in painting where it contaminates the painted surface, or in media blasting where it causes the media to clump and not work as well. As well as causing rust in the air tanks and air tools, moisture is best removed. A number of methods have been developed from expensive refrigerated driers used to pre-condition air before it gets to the compressor, to simple mechanical separators that sit in the air line between the tanks and the air tool. Here is a tank that uses a chemical desiccant to dry the air. There are also ways to install the air lines that are intended to either cause moisture to condense or collect before it is sent to the air tool. A non-mechanical separator causes the moisture in the hotte...

O-Ringing the Block and Heads for Higher Compression Engines HOWTO

I found some useful advice in this forum thread from user AK's REX. "To my understanding o-ringing the block or the head prove to be about equally effective. That said I would say it depends if you want to have receiver grooves machined. The most conventional method is to machine and o-ring the block, then machine receiver grooves opposite the o-rings in the heads. I guess it can probably be done in reverse fashion as well. As far as the receiver grooves are concerned, it not only helps in high compression and or boosted applications, but helps wet motors from losing fluid which is a common problem with copper head gaskets. It allows the o-ring to literally push the gasket into the receiver groove to provide a better seal. Speaking of copper gaskets here is a bit of info from SCE regarding this stuff; O-ring grooves may be cut in either the block or cylinder head. When using copper head gaskets thinner than .050, O-ring height should be no more than 25% of gasket thickness...

Retrofit Hydroboost Brakes

Traditional power brakes have used engine vacuum to reduce the physical effort required to stop a car. Some high performance engines, because of the design of their camshafts, do not produce enough vacuum to used vacuum-powered brake power boosters. One alternative is to add a vacuum pump to the accessories driven by the engine. Another is to use the hydraulic pressure supplied by the power steering pump to power the brake booster. This device is called Hydroboost and it replaces the vacuum-operated brake booster. It provides more than twice the pressure than a vacuum diaphragm booster. There are commercial kits to use a hydraulic booster, like Vanco . They offer kits to match the car you are modifying. The most complete kits provide the Hydroboost unit, a new master brake cylinder, a power steering pump and the appropriate hoses with fittings and they are priced at around $900. You can see the parts of the kit by visiting this link . A nice step-by-step installation of the Vanco h...